
How to Update the Software
Updates within the same major release
To update within the same major release (e.g. from R4.26.1 to R4.27.7), only the bqn package needs to be updated (e.g. bqn-R4.27.7.bpkg). The update consists of two steps: first it is installed and then it is activated. The activation involves a traffic interruption of some seconds, so it is advised to carry it out at times of low throughput.
The installation is performed in Administration->Software, clicking on the ⁝ menu icon and selecting Install… or selecting the Install new package button. A file selector pops up to choose the package, that it is transferred to the BQN server and installed.
A dialogue after the installation asks if the package should be activated.

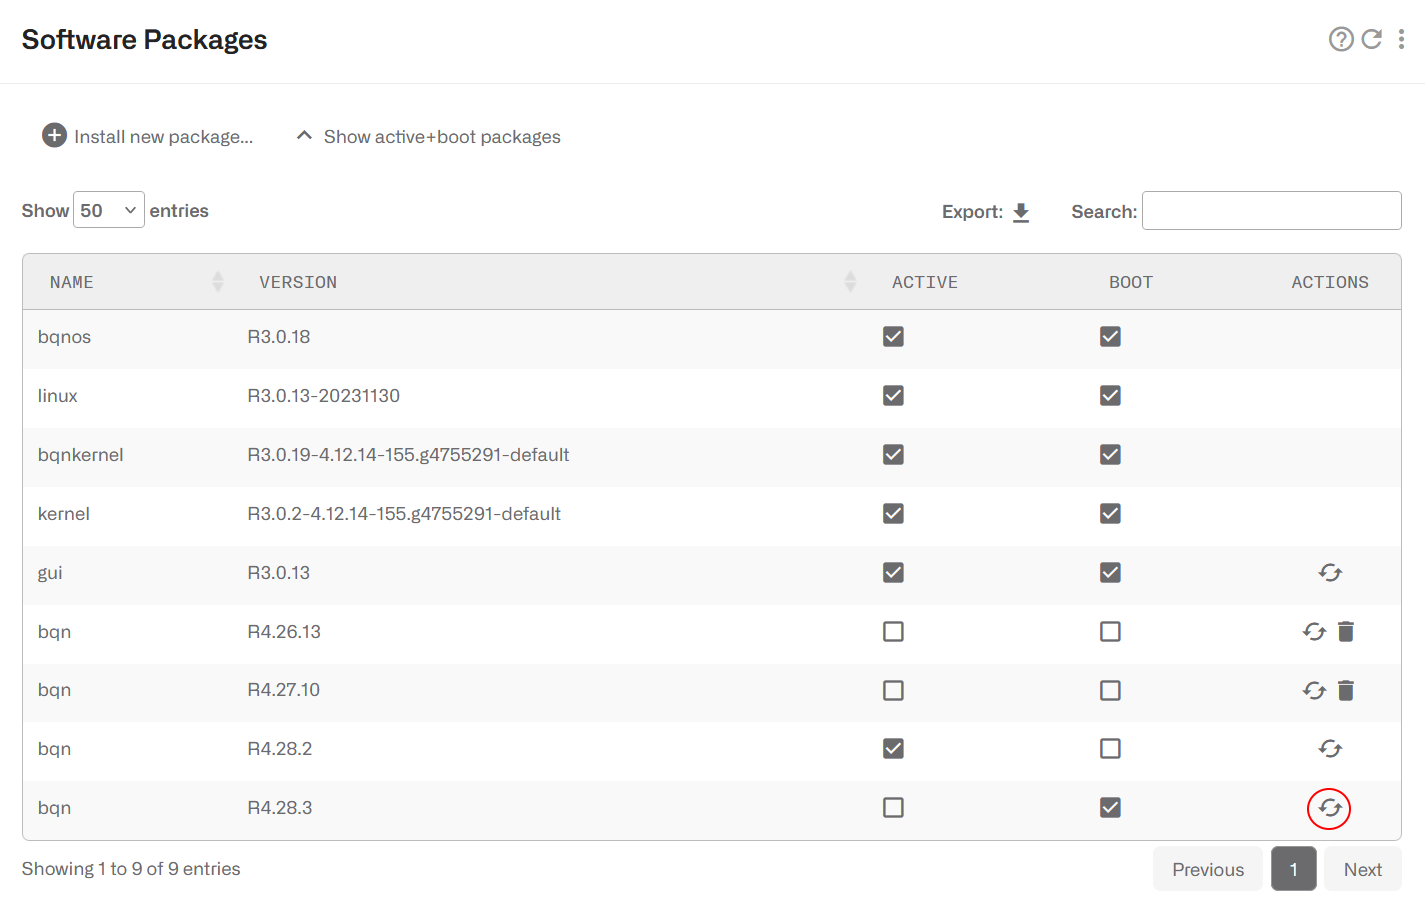
The activation can be done later on in Administration->Software clicking on the ↶ arrow icon of the package to activate (highlighted in red in the picture above).
A package activation forces you to log back into the BQN.
The activation takes between 10 seconds and two minutes, depending on the server configuration (number of networks interfaces, number of CPU cores and size of the memory).
During the activation, the traffic flowing through the BQN server is interrupted.
A package can be selected to be used in next server reboot ticking its BOOT check box.
You can show only packages in use by clicking on Show only active+boot packages.
Packages no longer in use (non-active and not selected for boot) can be removed with the dustbin icon.
Updates across major releases
Contact support@bequant.com for detailed instructions before performing an upgrade to a new major release.
To migrate to a new major release (e.g. from R3 to R4), the platform packages will need updates (bqnos, kernel, bqnkernel, linux and gui), in addition to the bqn package. Platform packages require a reboot to be activated. The process is the following:
1. Install new bqnos, wait for one minute and reboot
2. Install kernel and bqnkernel (together in in this order), wait for one minute and reboot
3. Install linux, wait for one minute and reboot
4. Install gui and reboot
5. Install bqn and reload
The server must be placed out of the traffic path, as server reboots will involve service losses.
Finally, the old configuration may require migration to the new release. As a minimum, you will have to remove deprecated commands accessing the BQN server via SSH and running the commands:
How to Generate a Diagnostic
When requested by Bequant support, a diagnostic file can be generated in Administration->Diagnostic.
The file will be placed in the download folder of the browser being used.
How to Back up the Configuration
You can save the server configuration to a local file in Administration->Backup->Save Configuration.
To load a previously saved backup, go to Administration->Backup->Load Configuration.
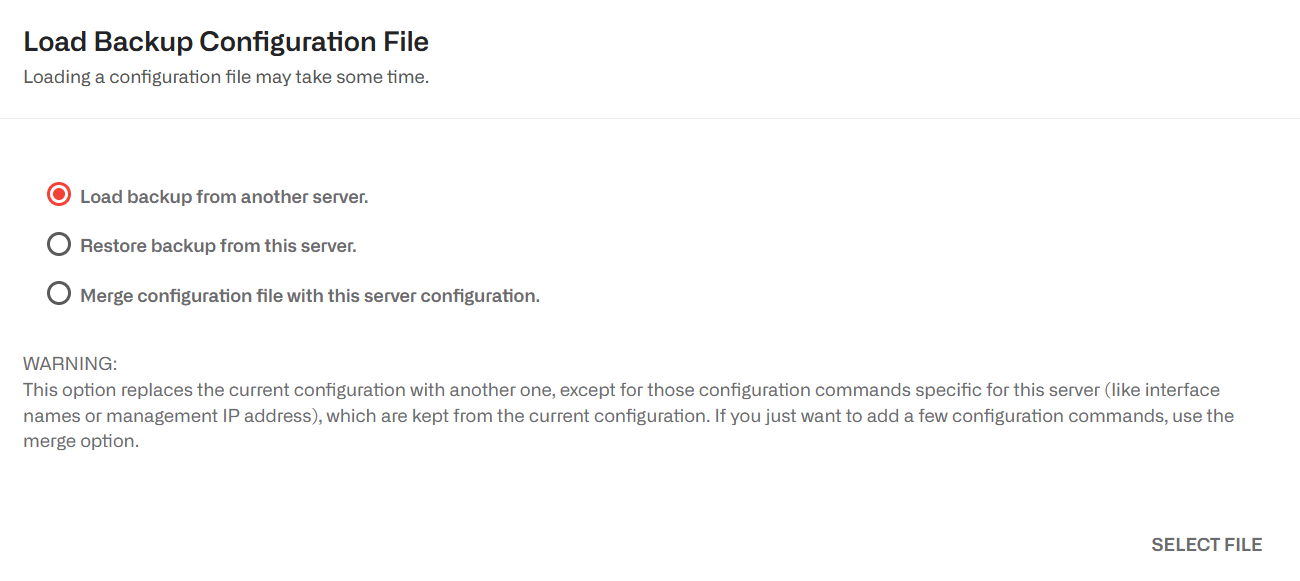
There are three options:
- Load a backup from another server. The purpose of this option is to bring a common configuration to a number of servers, with the same policies and API clients. When this option is used, only those generic sections of the configuration are loaded. Server specific parts (management interface configuration, data wires, licenses and API BQN own IP address) are left untouched.
- Restore a backup from this server. This option is used to recover a previous state of this server configuration. In this option, the configuration is completely replaced by the backup one, so it is important that the configuration comes from this very server, otherwise the server may be left unreachable.
- Merge a configuration file with this server configuration. This option is useful to carry only some configuration sections, for example a set of policy rules. In this option, the whole configuration in the file is added to the current configuration. Only generic configuration sections and of them, only the ones strictly needed should be included in the merge file,in order to avoid conflicts. For example, a configuration can have only one management default gateway, so merging a file containing a default gateway will replace the old one.
Select the load option and press SELECT FILE. Select the file to load and press Open. A dialogue will inform of the operation outcome (if OK or if an error is found). If there is an error, no modification is done to the server configuration (load operation is atomic).
How to back up External Information
Information introduced through external APIs (REST, RADIUS,Billing integrations) is not part of the node configuration. To get a backup and apply it to another or the same server, go to Administration->Save External Attributes.
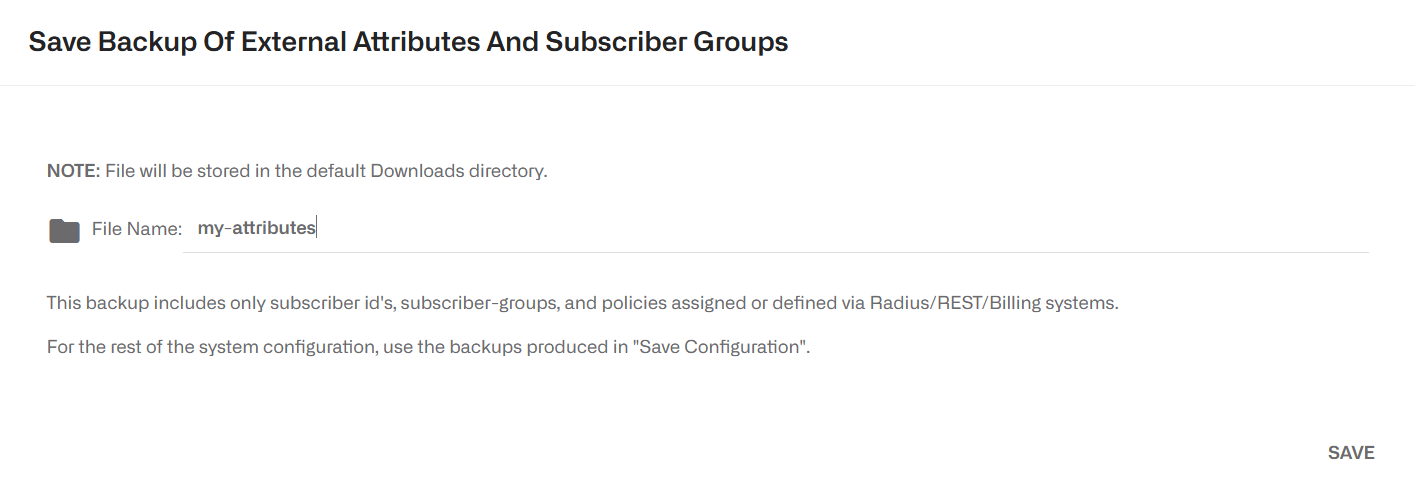
Specify a name for the backup file and press SAVE.
To restore the information from a backup file, go to Administration->Load External Attributes.

There are two options:
- Restore a backup. Thisoption will replace whatever external information in the BQN server by the content of the backup file.
- Merge a backup. The information in the backup file is added to the current external information on the BQN server. If an entity exists on both the BQN and the backup file (e.g. a subscriber), the backup content will override the BQN content.
Select a load option and press SELECT FILE. Select the backup file to load and press Open. A dialogue will inform of the operation outcome (if OK or if an error is found). If there is an error, no modification is done to the server configuration (load operation is atomic).
Monitoring with SNMP
The BQN supports the following SNMP v2c alarms (traps):
- CpuLoad: excessive server CPU load.
- MemoryUsage: excessive memory usage.
- Disk: file system full or almost full.
- Process: some mandatory processes down.
- Wire: no wires configured or some wiresdown.
- TrafficFlow: no traffic through the BQNserver.
- LicenseUsage: server throughput is abovethe license capacity.
- BillingSync: problem with billing synchronization.
These alarms are related to the dashboard shown in BQN homepage. See the Troubleshooting section for more information.
To configure the SNMP agent, go to Administration->SNMP:
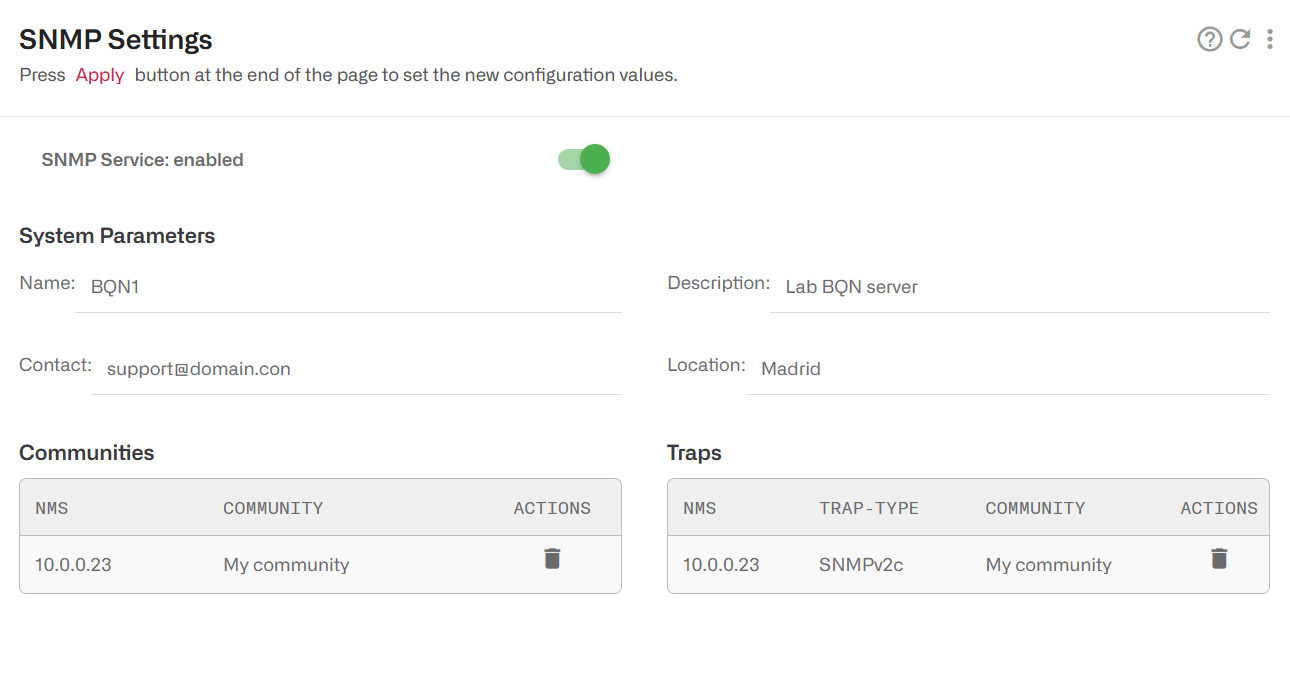
The BQN SNMP also exports some system statistics. To get the BQN MIB files, click here.
Traffic Captures
The BQN can be used to get traffic captures in pcap format from any of its network interfaces Those captures can be used to troubleshoot issues in the BQN server, but also somewhere else in the network, as direct traffic captures are many times difficult to obtain in other network nodes.
Traffic captures are indicated with a magnifying glass icon next to the interface name. It is available in the following pages:
- Status->Interfaces->Link State
- Status->Interfaces->Data Wires
Clicking in the icon displays a dialogue with the capture options:
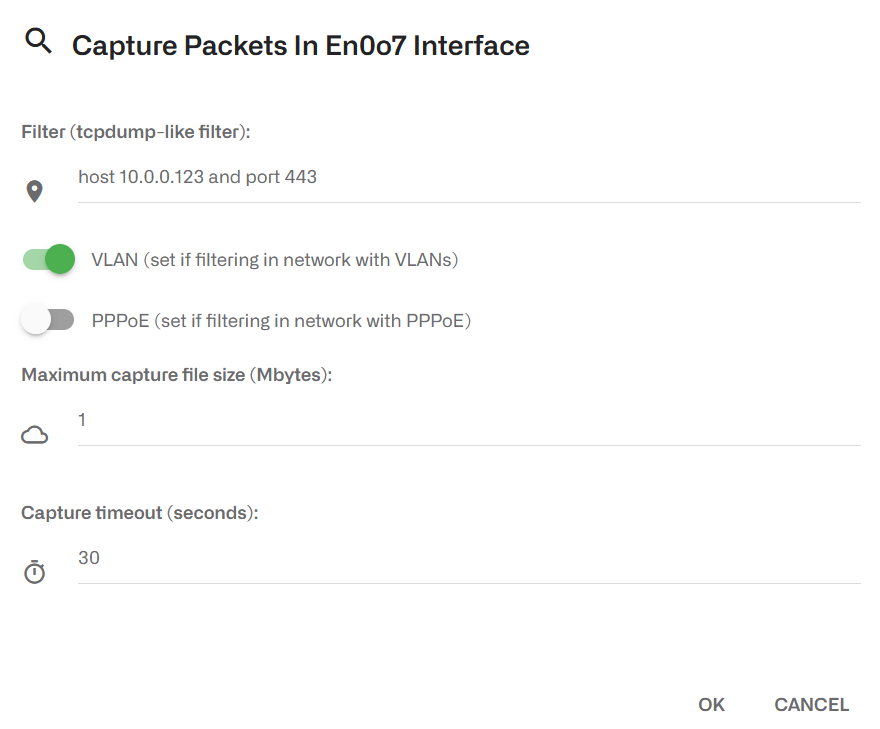
The filter field accepts the format of tcpdump filters. If is optional, and if empty, all traffic will be captured. Some filter examples:
- Traffic involving an IP address: host 10.0.0.23
- TCP traffic involving an IP address and port: tcp and host 10.0.0.23 and port 443
- UDP traffic involving an IP subset to a specific Internet address: udp and net 10.0.0.0/24 and host 8.8.8.8
If the network has VLANs and/or PPPoE, the corresponding toggle switch must be set for the filter to work. In the previous screenshot, the network has VLANs.
Maximum capture file size (up to a maximum of 500MB). The capture will stop when this size is reached.
Capture timeout (600 seconds maximum). The capture will stop when this time elapses. It can also be stopped before that pressing the CANCEL button,
The capture is limited by a maximum size and timeout(whatever happens first). The reason is to protect the system, because traffic captures has a performance impact.
To reduce the performance impact on the system, use the smallest size and duration meeting your needs.
Once the capture is complete, a pcap file will be generated in the browser download folder. The file can be inspected using a traffic tools supporting the pcap format, for example wireshark.
Logs
In order to help in the debugging of complex issues, the GUI displays two types of logs:
- OS log messages. Go to Administration->Logs->System.
- Kernel log messages (output of dmesg command). Go to Administration->Log->Kernel.
It is possible to request more log lines and to export the export entries to a local file.
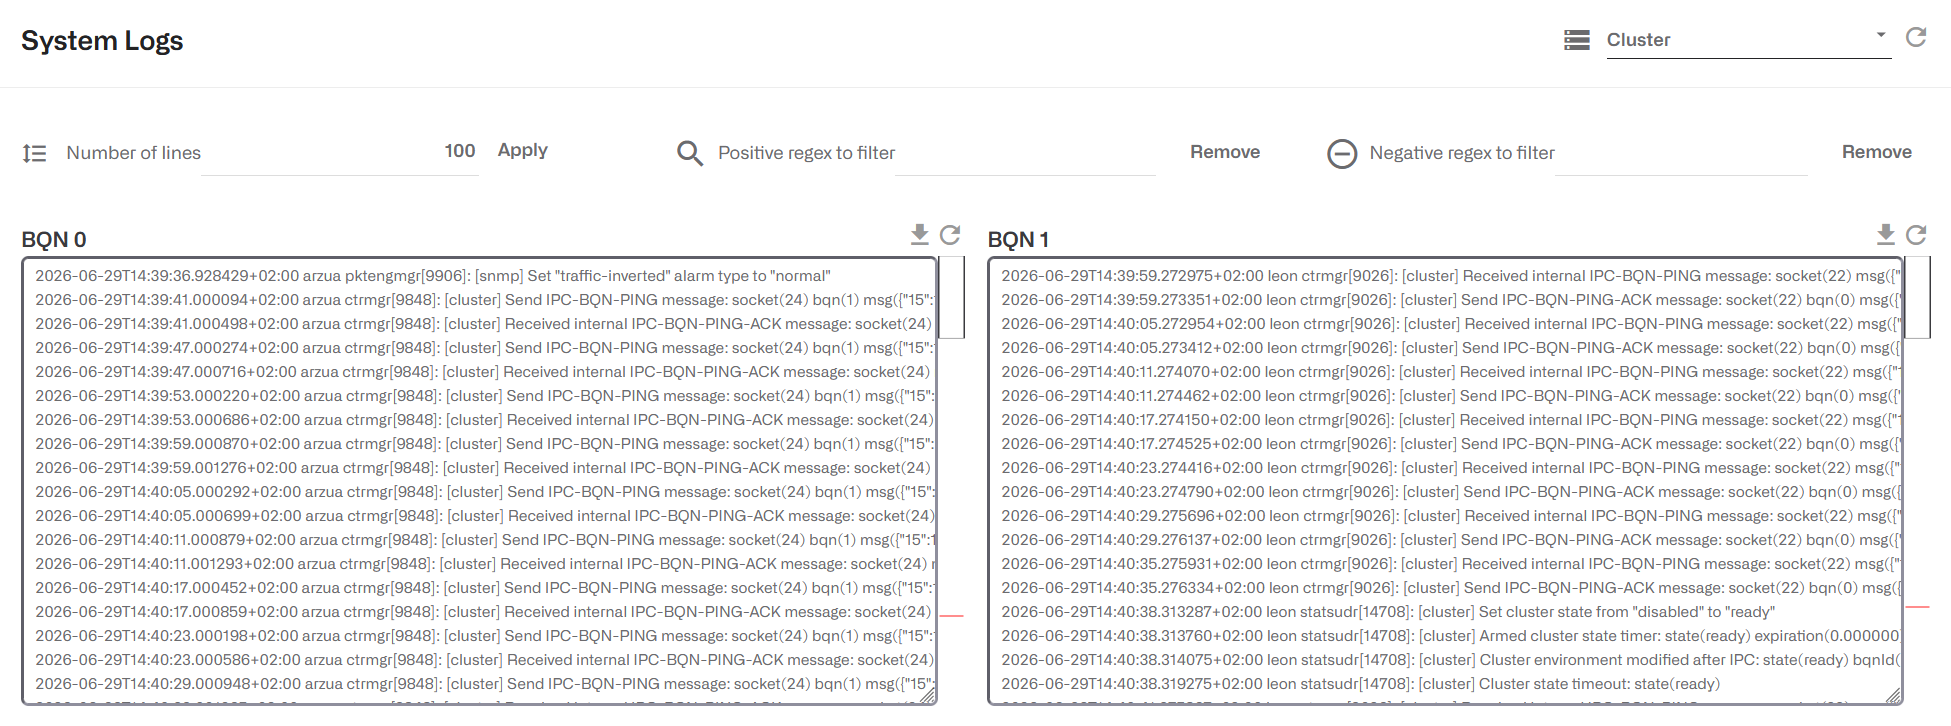
If the BQN server is part of a cluster, logs of the different servers are shown.
It is also possible to apply filters in regular expression format, both positive (it shows log lines matching the expression) and negative (it shows log lines NOT matching the expression).
System Users
The BQN system has two types of users:
- Administrators: with unrestricted access to the node functionality, including configuration changes and software installation. By default, a user named bqnadm is created with administration profile.
- Operators: with access only to data visualization. By default, a user named bqnop is created with operator profile.
An administrator can create, delete or modify system users in Administration->Users.
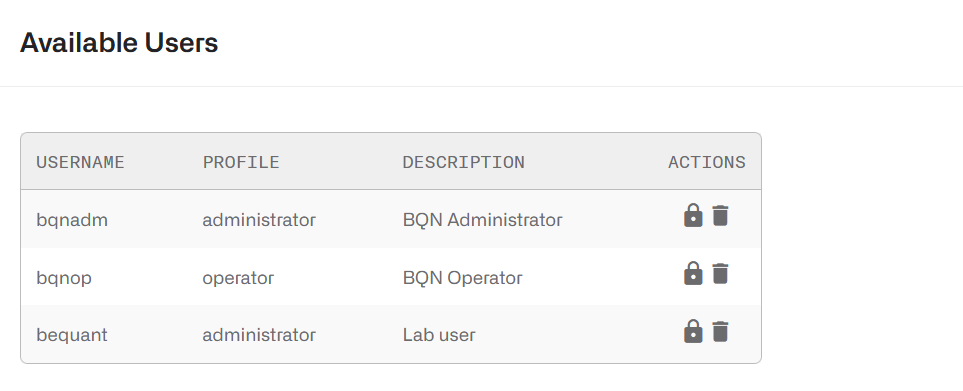
Click on the lock icon to change the user password. Avoid using quote (‘) and double quotes (“) as part of the password value
Software Bypass
Traffic Bypass
It is possible to make some traffic to go through the BQN transparently, without being processed by BQN. Such traffic will be captured in one of the network interfaces and relayed transparently to its peer interface in the same wire. That way, the BQN software will have no impact on such traffic.
The kind of traffic that can be configured to be bypassed are:
- IP traffic v4
- IP traffic v6
- PPoE traffic
- Traffic with some specific VLAN tags.
- Traffic without a VLAN tag (i.e. untagged).
- Some IPv4 and/or IPv6 addresses or address ranges.
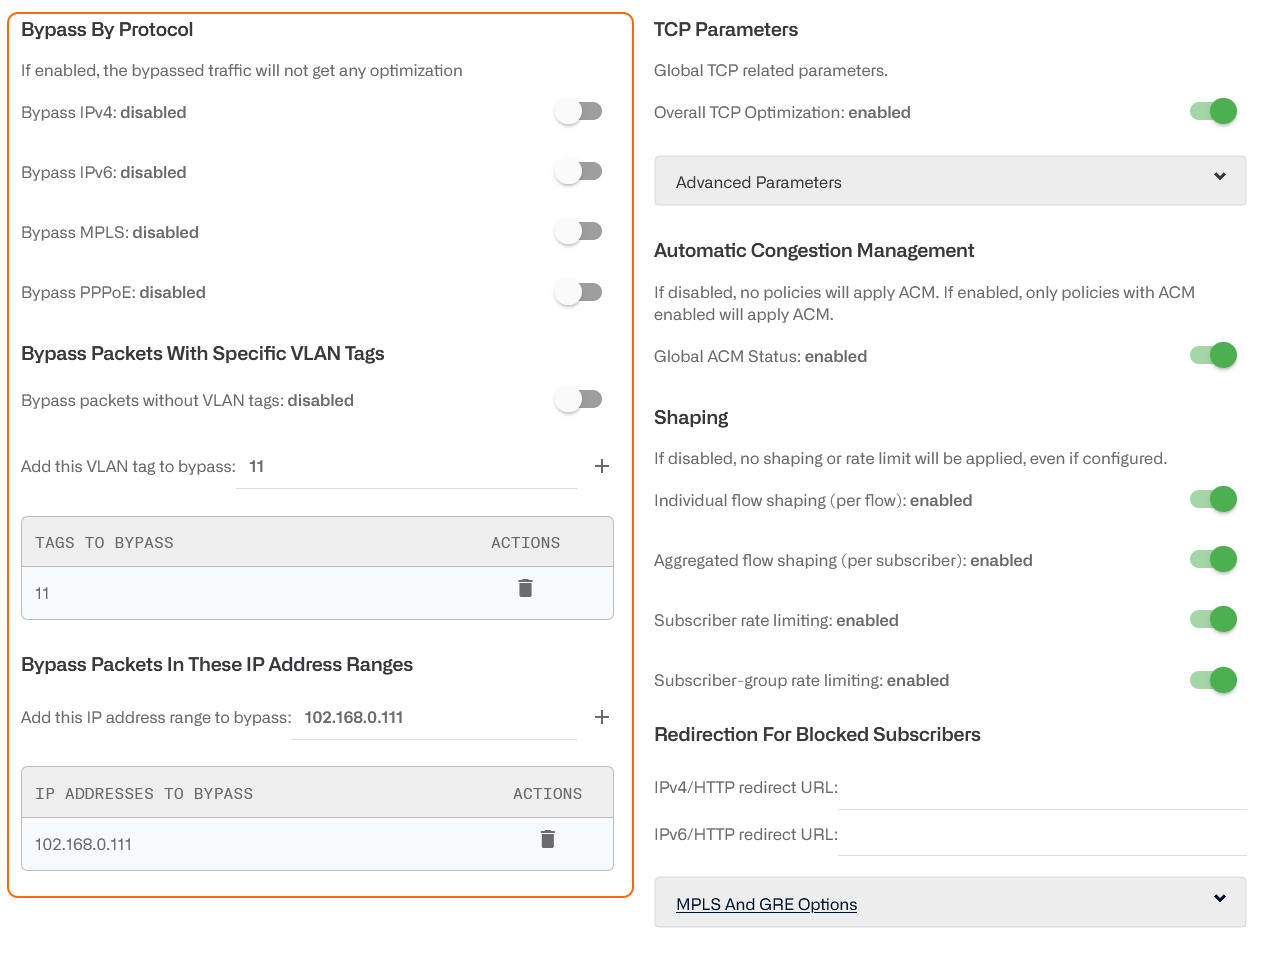
To bypass some traffic, go to Configuration->Optimization Settings and enable the corresponding toggle.
For VLANs and IP ranges, type in the value, press + to add it and apply the settings.
Take into account that bypassed traffic will not benefit from BQN features: it will not be optimized, no metrics will be recorded and no policies applied.
Shaping
It is possible to disable the shaping (traffic speed rate limiting) applied by BQN policies at different levels:
- Individual flow shaping: limit per flow. Definedin flow policies.
- Aggregated flow shaping: limit per subscriber.Defined in flow policies.
- Subscriber rate limiting: limit per subscriber.Defined in rate policies associated to subscribers.
- Subscriber-group rate limiting: limit persubscriber group. Defined in rate policies associated to groups.
Special Traffic processing options
There is a special section for GRE and MPLS options.
By default, the BQN does not see inside a GRE tunnel to obtain subscriber IP addresses. This can be changed enabling Get IP addresses from inside GRE tunnel.
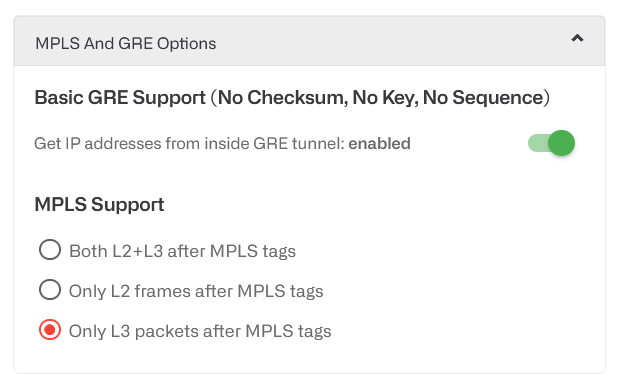
For MPLS, there are three processing options:
- Only L3 packets after MPLS tags. The MPLS tags are always followed by an L3 packet (an IP packet). This is the default setup.
- Only L2 frames after MPLS tags. The MPLStags are always followed by an L2 frame (an Ethernet frame).
- Both L2+L3 after MPLS tags. After the MPLS tags, we can have either an L2 frame or an L3 packet. Here, the support is restricted to IPv4 traffic. If IPv6 traffic is present, some MAC addresses in an L2 frame may be confused with an IPv6 address and the BQN will not be able to process it, though it will be relayed to prevent discarding any traffic.
When a server is in cluster, this page has a server selector to define to which BQN server apply the changes.
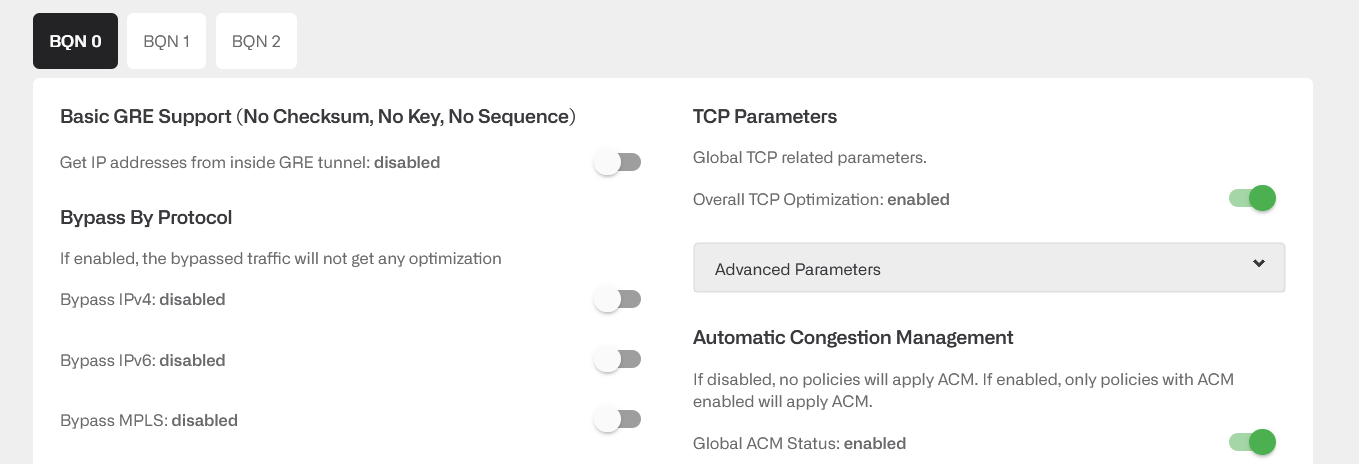
Bypass cluster configuration
When a server is in cluster, this page has a server selector to define to which BQN server apply the changes (you can also use thecluster menu in the upper right). To apply the same setup to all servers in the cluster, use the All tab.
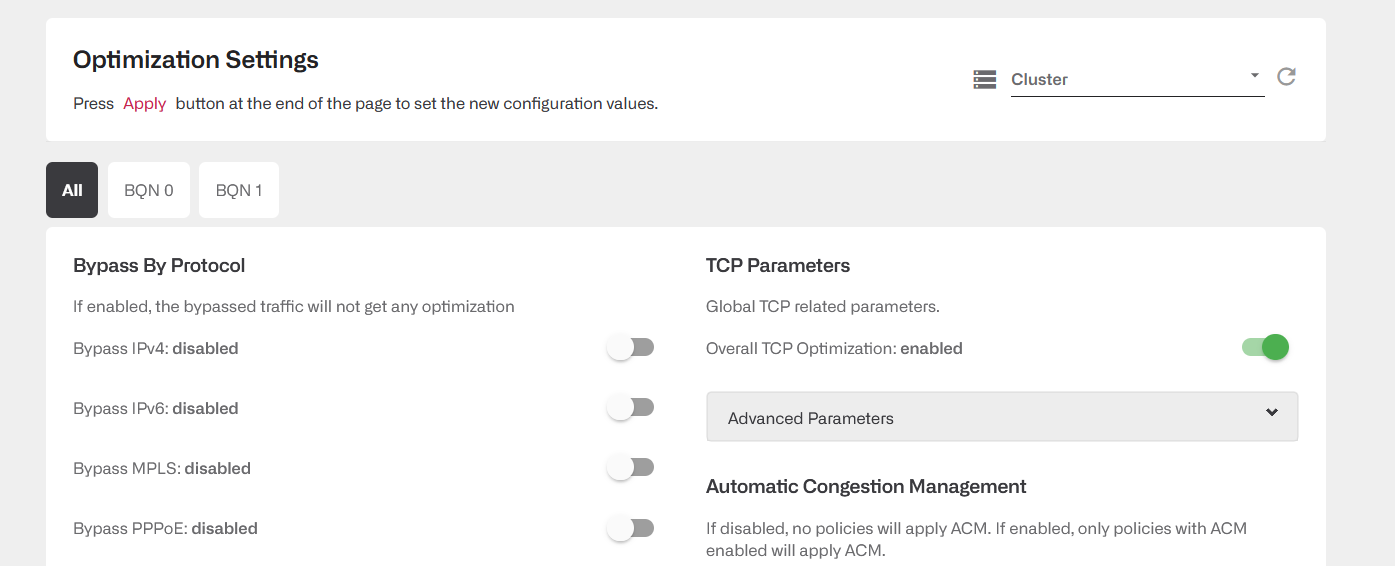
In there are differences between servers, the All tab will show them and a tooltip summarizes the value in each BQN server. In the following example, only BQN 0 has enabled a bypass of IPv4 and IPv6, some VLAN tag and IP address have been created to be bypassed in all the cluster and some have been created to be only bypassed by one of them.
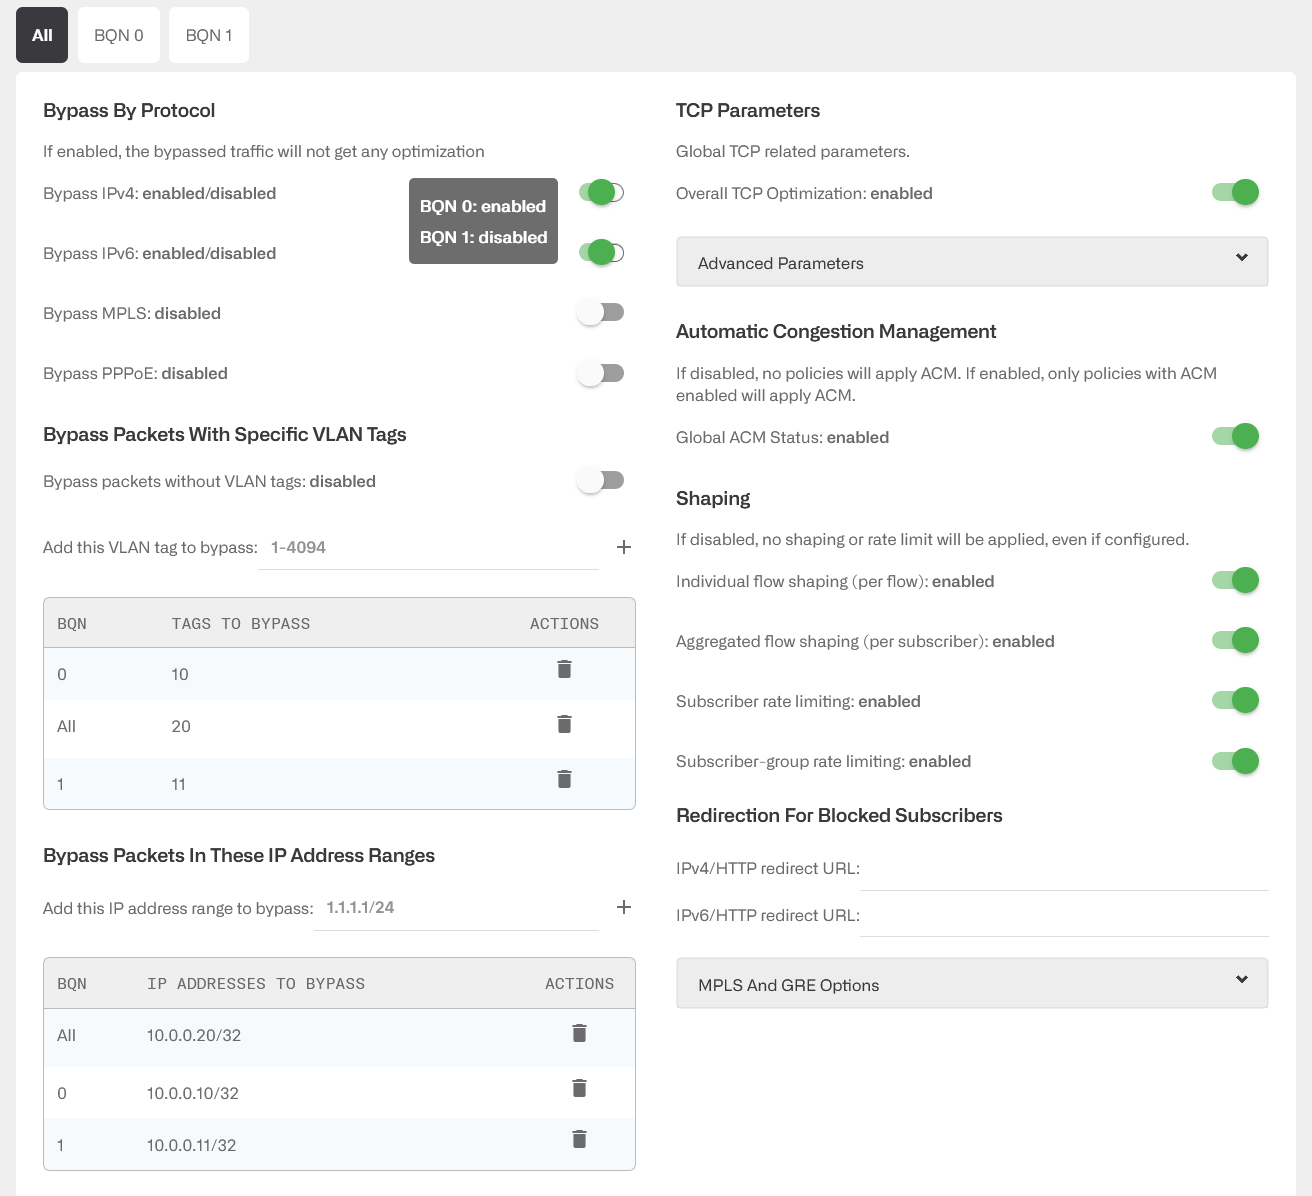
The following parameters are always common to the whole cluster:
- RTTi-small and RTTi-big in Internet Side RTT Parameters.
- Redirection for blocked subscribers.
- MPLS Support options
Secure Setup
Session Timeout
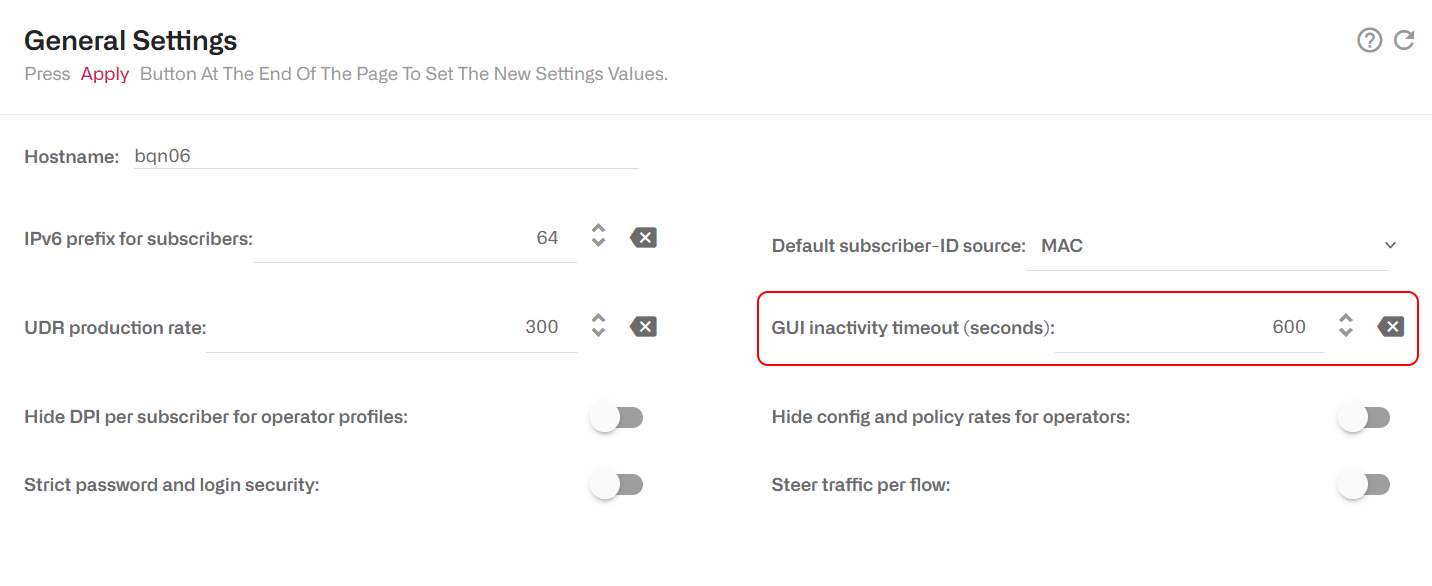
A configurable timeout will disconnect a GUI session after a time of inactivity.
To enable the inactivity timeout, go to Administration->General Settings and set the value in seconds in GUI inactivity timeout and press Apply.
The inactivity timeout will be applied to new sessions.
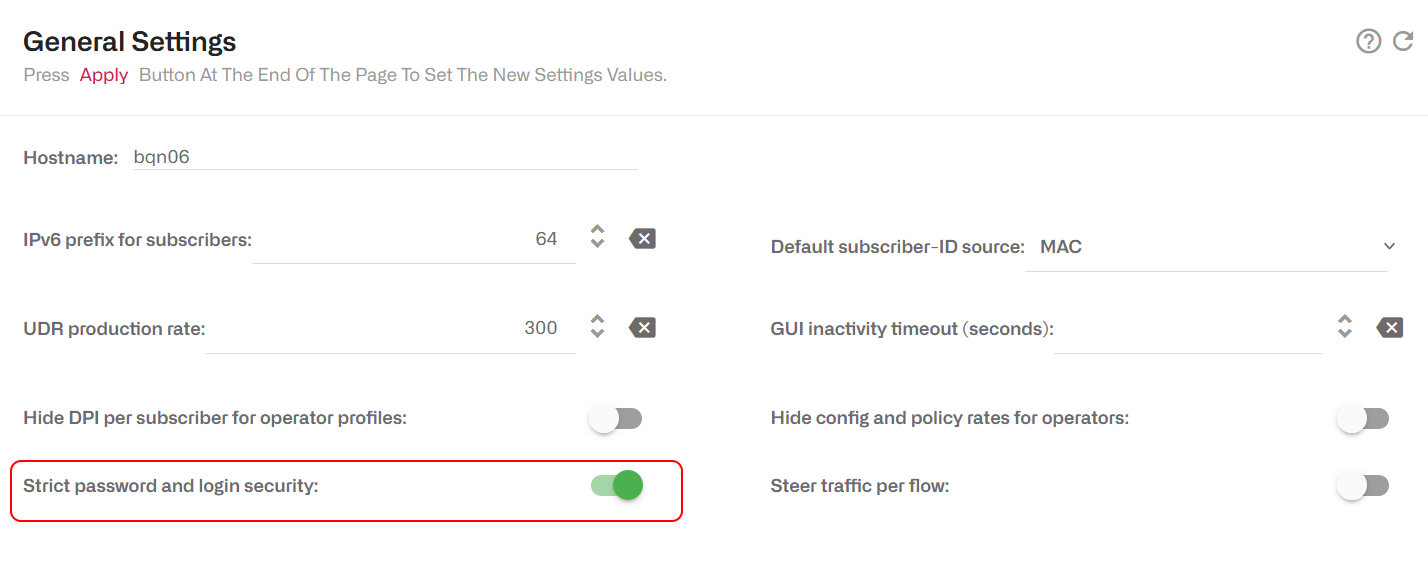
Strong User Passwords
By default, when setting a user password, any value is valid. It is possible to strengthen the system security by forcing some minimum complexity to user passwords. To do so, go to Administration->General Settings and set the to On the switch Strict password and login security.
When the strict password switch is set to On, the following minimum password complexity is enforced (and password change rejected if not met):
- Length of at least 8 characters.
- At least one lowercase letter.
- At least one uppercase letter.
- At least one digit.
- At least one special character.
- The username cannot be part of the password, either straight or in reverse form. For example, if user is bqnadm, passwords Bqnadm6? and Mdanqb6? are rejected.
In addition, the password must pass pam_cracklib simplicity test. This test rejects poor passwords such as:
- Dictionary words
- Palindromes. E.g. Af16-61fA
- Same consecutive characters. E.g. …aaa…
- Too long monotonic sequence. E.g. …123… or …abc…
- Less than five differences with the old password.
Also, the account is blocked for five minutes after five consecutive failed login attempts. Root is excluded from this policy to avoid denial of service attacks.
Management Interface Firewall
To set up the management interface firewall, which will only apply to the management interface (not to the interfaces configured in wires) select on the lateral menu Configuration->Interfaces->ManagementFirewall. This will show the IP address ranges allowed to access the management interface. By default, no IP address ranges are configured, and all are allowed.
To add an allowed IP address range, click the menu icon and press on Add IP Address Range…. Once one IP address range is allowed, the firewall is enabled, and all incoming connections from IP addresses not part of the configured IP address ranges will be blocked. It is therefore important to include an IP address range that covers the IP address from which we are accessing the GUI and also the subnet of the management IP address (the GUI will include them in the suggested list). Other IPs that interact with the management interface, such as RADIUS/REST clients, a billing system and the NTP server, should also be included.
To disable the firewall, remove all entries pressing the delete icon next to each entry, and once all entries are deleted, click once the Apply button. It is important not to press Apply before all entries have been deleted, because a premature Apply would keep the firewall active and it may prevent you from accessing the server, if the entry covering your IP is not present.
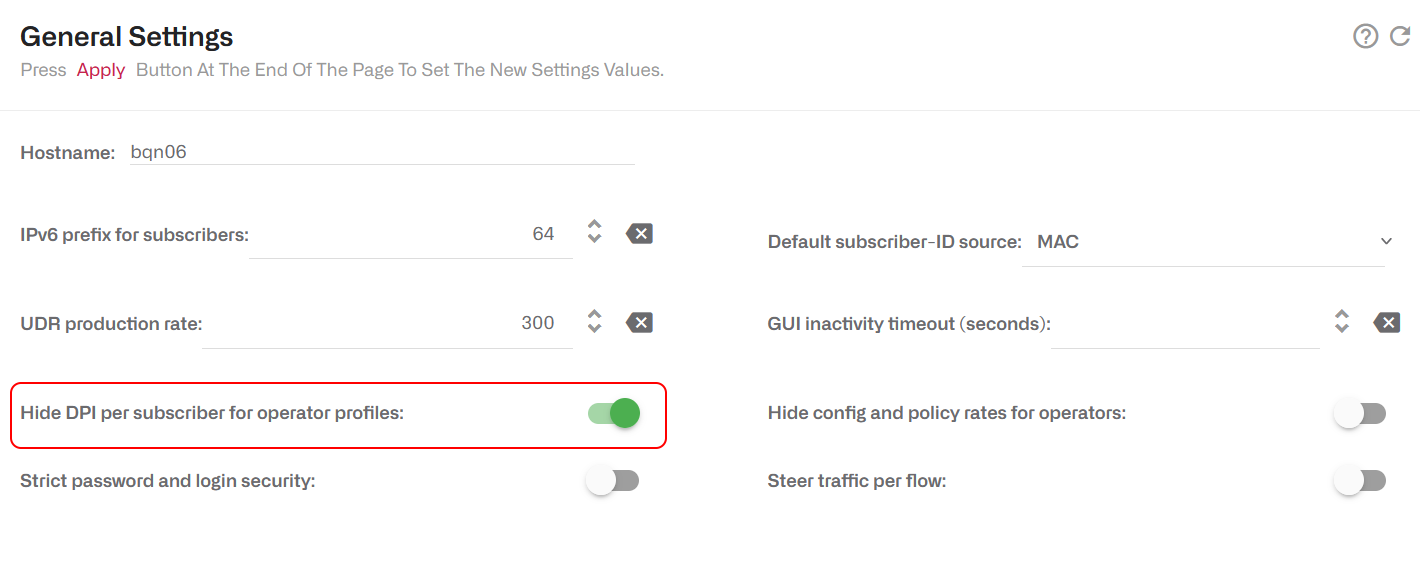
Hide Per-subscriber Application Information to Operators
It is possible to configure the system so users with operator profile do not see the following information:
- In Subscriber dashboard, the DPI service details.
- In Subscriber dashboard, in the active flow table, the DOMAIN column.
- In Statistics->DPI Analysis->Hourly Volume Per Application, the IP/Subscriber ID filter.
- In Statistics->DPI Analysis->Total Volume Per Application, the IP/Subscriber ID filter.
To disable access to that information, go as administration to Administration->General Settings and enable the switch Hide DPI per subscriber for operator profiles.
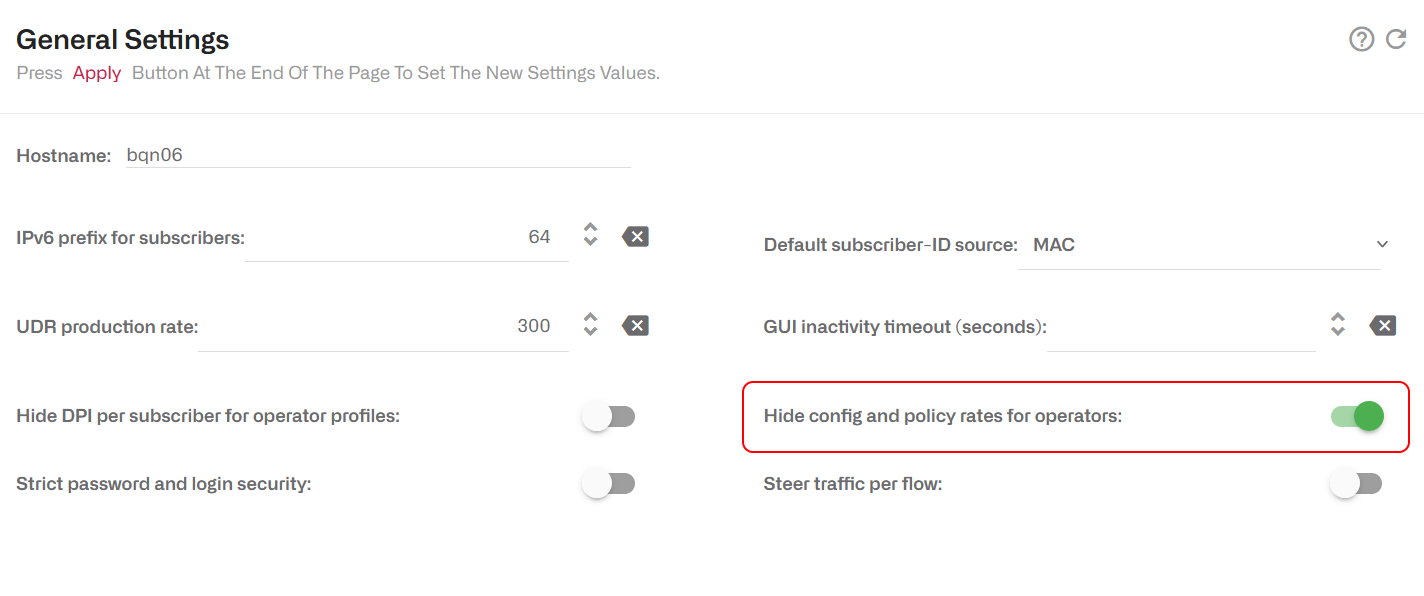
Hide Configuration and Rate Policies to Operators
It is possible to configure the system so users with operator profile do not see the following information:
- Rate policy details in In Subscriber dashboard.
- Rate policy details in tatus->Subscribers->QoE metrics.
- Configuration section.
To disable access to that information, go as administration to Administration->General Settings and enable the switch Hide config and policy rates for operators.
Audit log
The system keeps an audit log with a register of the most relevant actions performed in the system. The files are in /opt/bqn/var/audit and readable only by the root user.
The current audit file is called audit and old audit files will be compressed with gzip and named with the Unix epoch time of rotation (e.g. audit-1688636727.gz). Old files are kept for 182 days.
Each file row is an audit entry with the following fields:
- Time: Date and time of the event, in format YYYY-mm-ddTHH:MM:SS+UTC-Offset.
- Type: Type of action: access, config, software, system, users.
- Author: Name of the system user performing the action, in the cases where it is available.
- Description: Action description.
Some of the registered actions are:
- Access to the system.
- Users created/deleted.
- User password modifications.
- Configuration changes.
- Software updates.
- System reboot or shutdown.
- Time local/zone changes.
Sending system logs to a syslog server
It is possible to configure the BQN to send its system logs to an external syslog server. The syslog server must support BSD syslog protocol (IETF RFC 3164) or syslog protocol (IETF RFC 5454).
To do the setup, log as root via SSH and follow these steps:
Create the following directory, so the changes are persistent:
Copy the original configuration file into that directory:
Edit the configuration file:
If the BSD syslog protocol is used (IETF RFC 3164), add this line to the configuration file:
Replace server-IP by the syslog server IP address and server-port by its port (e.g. 514).
If the format needed is syslog protocol (IETF RFC 5454):
Reboot the system:
And that’s it, the BQN system logs in /var/log/messages should be sent to the syslog server.
If later on, you do changes to the configuration file, you need to restart the rsyslog service for the changes to be applied:
Check that the service is OK by requesting its status:
Configuration using TLS
To encrypt the communication with the syslog server, the BQN needs the package linux-R3.0.13-20231130 or later. Transfer the server certification authority certificate to the BQN server rsyslog directory:
Edit the configuration file:
Add the following lines before the . action line (chosen port is normally 6514, review it in action line):
To apply the changes, restart the rsyslog service:
Lorem ipsum dolor sit amet, consectetur adipiscing elit. Suspendisse varius enim in eros elementum tristique. Duis cursus, mi quis viverra ornare, eros dolor interdum nulla, ut commodo diam libero vitae erat. Aenean faucibus nibh et justo cursus id rutrum lorem imperdiet. Nunc ut sem vitae risus tristique posuere.
Lorem ipsum dolor sit amet, consectetur adipiscing elit. Suspendisse varius enim in eros elementum tristique. Duis cursus, mi quis viverra ornare, eros dolor interdum nulla, ut commodo diam libero vitae erat. Aenean faucibus nibh et justo cursus id rutrum lorem imperdiet. Nunc ut sem vitae risus tristique posuere.
Lorem ipsum dolor sit amet, consectetur adipiscing elit. Suspendisse varius enim in eros elementum tristique. Duis cursus, mi quis viverra ornare, eros dolor interdum nulla, ut commodo diam libero vitae erat. Aenean faucibus nibh et justo cursus id rutrum lorem imperdiet. Nunc ut sem vitae risus tristique posuere.