
Before starting with the installation, check that the server meets the hardware requirements.
Generate Bootable Drive
A new installation requires the server to boot an ISO image, the Bequant Installation Image. The ISO image contains the installation programs, operating system and product software.
Get the latest iso file from Bequant support (support@bequant.com).
The BQN ISO is already bootable. To burn the ISO file into a USB drive:
In Linux, use the dd command:
Example (USB driver in /dev/sdb and displaying progress information):
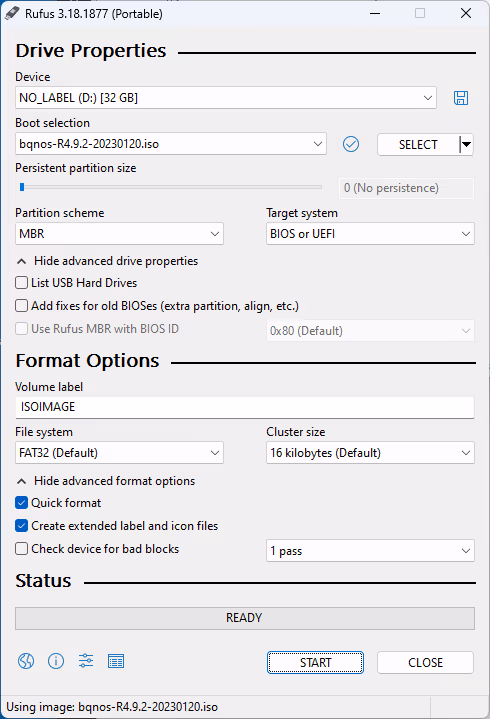
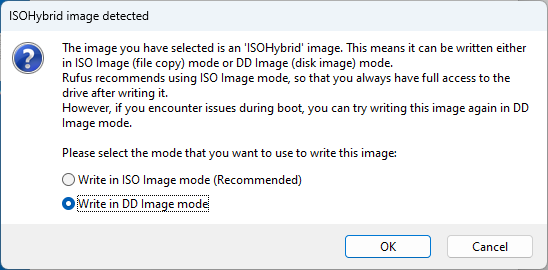
In Windows, use Rufus (https://rufus.ie). Select MBR partition scheme and DD image mode.
Alternatively, in servers with a lights-out management (LOM) interface (such as the HPE iLO, Dell iDRAC or Supermicro IPMI) the ISO file can be mounted directly as a virtual drive.
BIOS Settings
In order to access the BIOS/System settings you will have to press a special key during the Power-On Self Test (POST) sequence (it may be F2, F9, DEL or some other key displayed on the screen).
The following sections describe the settings to check in the server BIOS.
Boot mode
The server should have its factory default boot mode (for example, DUAL).
The ISO supports both legacy/MBR/BIOS mode or UEFI mode. Many modern servers only support UEFI boot mode, but for the rest, either mode is available.
If UEFI mode is selected as the boot mode, make sure that Secure Boot is disabled in the BIOS/System settings.
Server Clock
The server clock must be set to UTC (coordinated universal time) in the BIOS.
The current UTC time can be obtained at page: https://www.timeanddate.com/worldclock/timezone/utc.
Verify both date and time of date settings.
Note: the time zone will be configured later on, during BQN ISO installation.
Performance Settings
Some servers have several power profiles whose choice affects the server performance. Check them if this is the case. For example, in Dell servers, select the Performance choice in the BIOS System Profiles section.
Disk Setup
If no RAID controller is available, skip this section.
If there is a RAID controller, in most cases, the RAID controller requires that the disks available to the operating system must be defined in the RAID controller configuration, even if there is only one disk or if no RAID redundancy scheme is used. Therefore, prior to the BQN installation process, it is necessary to create a logical or virtual drive inside the RAID controller. In addition, the logical or virtual drive must be marked as a bootable disk.
The RAID controller configuration is usually available during the server Power-On Self Test (POST) sequence.
The RAID type depends on the number of physical disks available:
- If only one physical disk: RAID0.
- If two physical disks: RAID 1.
- If four or more physical disks:RAID 1+0 (stripe of mirrors).
Note: if there is an odd number of physical disks, the remaining disk will be used as a spare.
BIOS Configuration of NUMA servers
This section should be followed only with NUMA servers. A NUMA server is a server with more than one processor where the cost of accessing memory is not constant and depends on the position of the memory module relative to the CPU core doing the access. Bequant only support NUMA servers with up to two processors.
AMD EPYC servers
Because of EPYC internal design, all AMD EPYC servers are NUMA, including servers with only one physical CPU. The following BIOS options settings are needed:
NUMA Nodes per Socket
If each server CPU has more than 32 hyperthreads, we divide each physical CPU (CPU socket) into two NUMA nodes using the following BIOS setup:
- NUMA Nodes Per Socket: 2
As a result, we will see four NUMA nodes in a two-CPU server and two NUMA nodes in a one CPU server.
Memory Interleaving
Memory interleaving assigns memory positions with contiguous addresses to different DIMM modules of RAM. This is desirable, but we want interleaving only across DIMM modules of the same NUMA node. In AMD, this is achieved with the following option:
- Memory Interleaving: Auto.
Intel servers
Memory Interleaving
Memory interleaving assigns memory positions with contiguous addresses to different DIMM modules of RAM. This is desirable, but we want interleaving only across DIMM modules of the same NUMA node. In Intel, this is achieved with the following option:
- Memory Interleaving: disable.
This option still does memory interleaving, but it is restricted to DIMM modules in the same NUMA node, which is what we want to avoid the performance penalty of accessing DIMM modules in the other NUMA mode.
Install Software from the Bootable Drive
After completing all required BIOS Settings steps, insert the USB drive.
Start or reboot the system, select the one-time boot menu and choose the USB drive.
Once the Bequant Installation image is loaded, it presents the following screen:
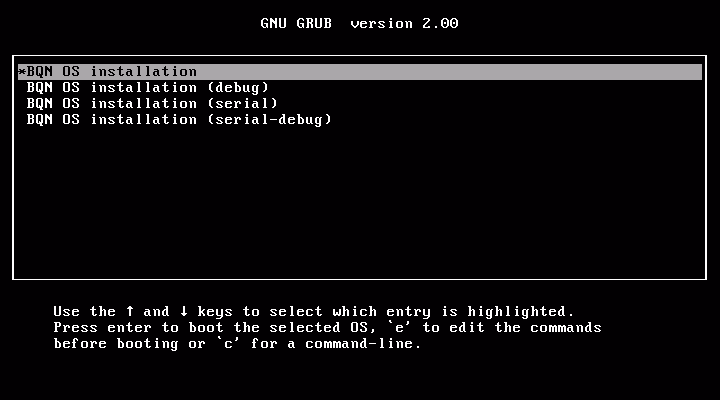
Press ENTER on the first option, BQN OS installation (if nothing is done, it will be selected automatically after ten seconds).
Some notes on navigating the ISO installation screens:
- Use the right and left arrows or the TAB key to move between buttons.
- Press ENTER to select a button.
- Use the up and down arrow keys to move across a list.
- Pressing a letter will place the list on the first element starting by that letter.
- Press the space bar to select a list item.
Disk Selection
If more than one disk is available, a menu with the available options will be shown (otherwise the installation will go to the partition window, see next section):

Select a disk to install the BQN software (normally /dev/sda) and press ENTER. Note that the USB drive may be listed, so do not get confused and do not select it for the installation (the USB drive is the source of the software, not the installation target).
Disk Partitions
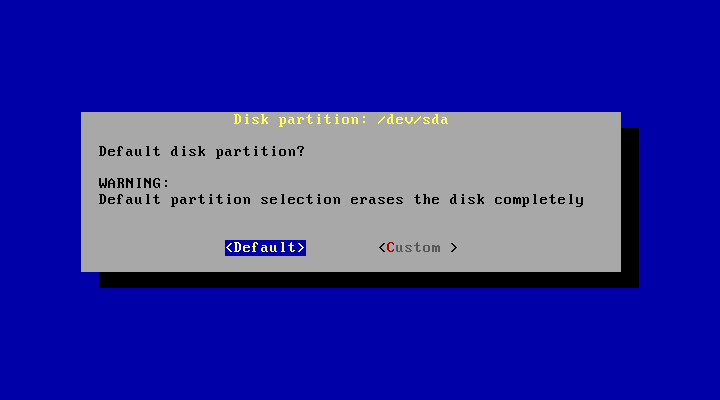
Select the Default partition scheme in almost all cases, except if the server is not new and it has a previous installation that did not use DOS or MBR disk label format (for example, it was formatted with GPT).
The default partition scheme uses the wholedisk and erases all the existing data. This partition scheme creates two partitions:
- A swap partition, with a size of half the amount of physical RAM memory. The default swap size is not bigger than 64 GB or 25% of the total disk space.
- A BQN OS Linux partition, sized using all the remaining disk space.
Custom partition
Whenever possible, we recommend using the default partition option, but if a custom partition is needed (for example, a server with a previous non-DOS/MBR installation), click on the Custom option.
The partition customization is done with the Linux fdisk utility.
The installation requires 2 partitions:
- Linux swap: fdisk type 82
- Linux partition: fdisk type 83
If a partition type does not exist, a new one must be created using the fdisk utility. The following fdisk commands are used to modify the partition table:
- n: create a new partition, either a primary or a logical partition (inside an extended partition).
- p: print the partitiontable.
- d: delete a partition.
- t: change the partition system ID, which is set to Linux (83) by default. For a Linux swap partition the system code is 82.
- o: create an empty DOS partition table. This command is required if the disk was previously partitioned with a different partition table type, such as GPT (if UEFI was used).
- w: write partition table to disk and exit.
- q: quit without saving changes.
Keyboad map selection
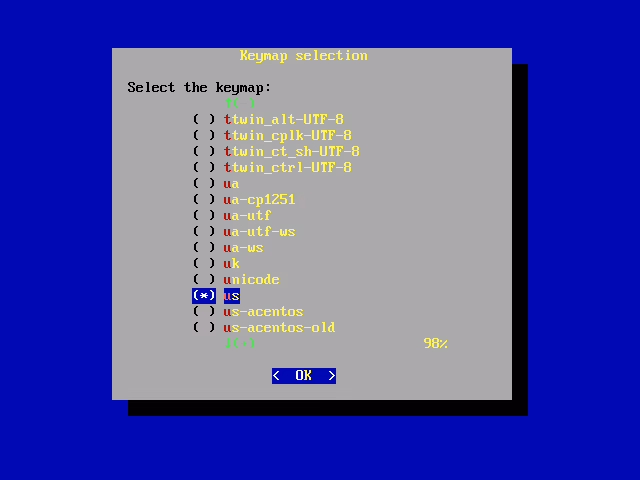
US keyboard is selected by default. To select a different keymap, move in the list (for example, pressing “e” plus three arrow downs will place the list on Spanish “es” keymap). Select the list item with the space bar and press ENTER.
Host name
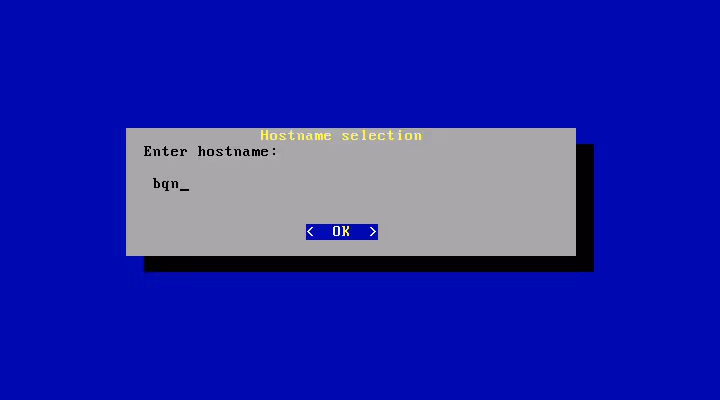
Enter the hostname of the BQN server (this can be changed later during the post installation procedure or, after that, using BQN GUI).
Time zone selection
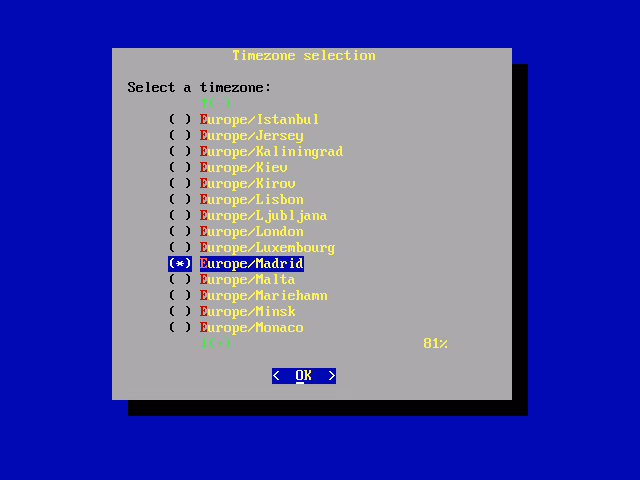
Central European Time (CET) time zone is selected by default. To select a different time zone, move in the list, select with the spacebar and press ENTER (this can be changed later during the post installation procedure or, after that, using BQN GUI).
Root password
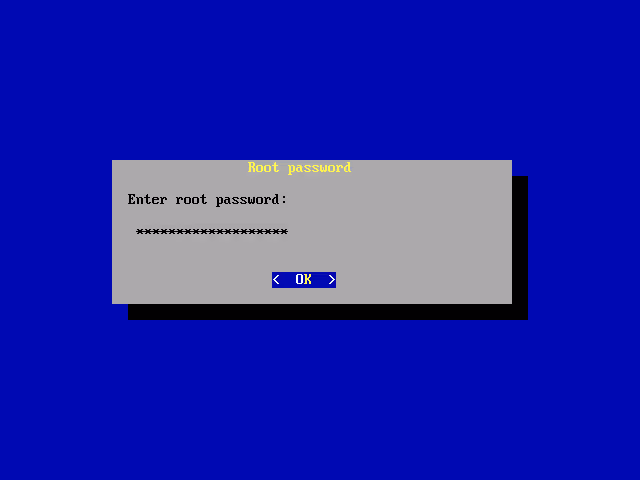
It is important that the root password is kept in a safe place to log into the BQN server during the post installation. The root password can be changed then.
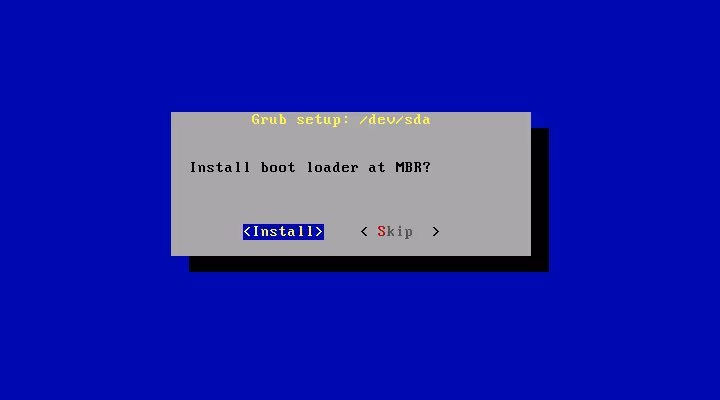
Install boot loader
ENTER Install, to install the boot loader at the Master Boot Record (MBR).
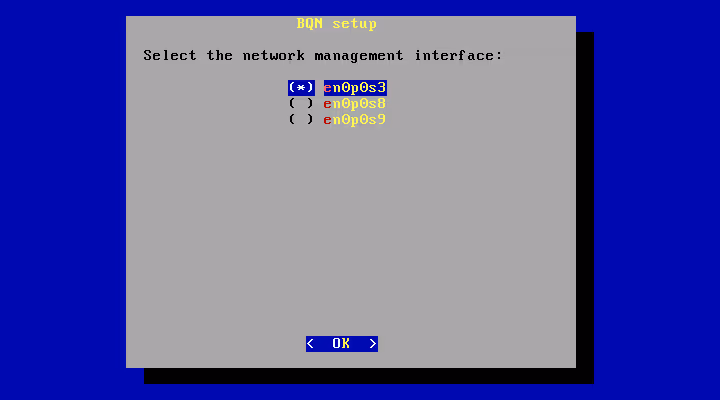
Configuration of the BQN management interface
ENTER Yes to start configuring the BQN management interface.

Select the BQN management network interface. The first port in the server motherboard is preferred (typically named en0o1). This can be changed later during the post installation procedure or, after that, using BQN GUI.
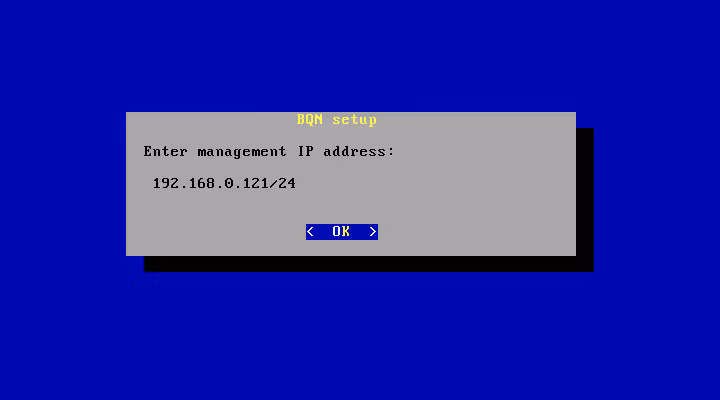
Enter the BQN management IP address with its subnet mask (by default, 192.168.0.121/24):
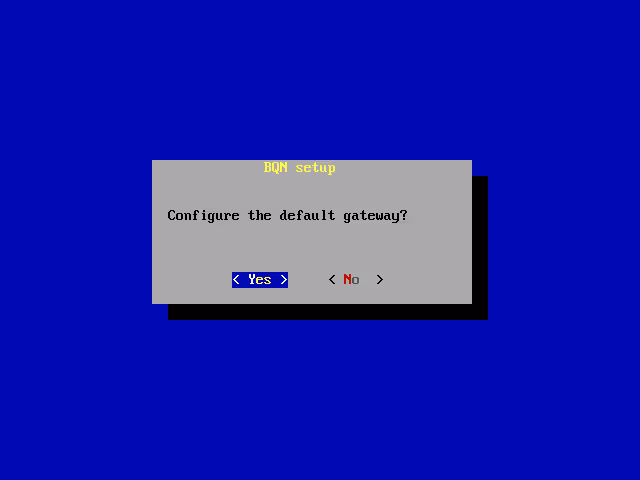
Say Yes to configure the default gateway and specify its address in the screen that follows (by default, 192.168.0.1):

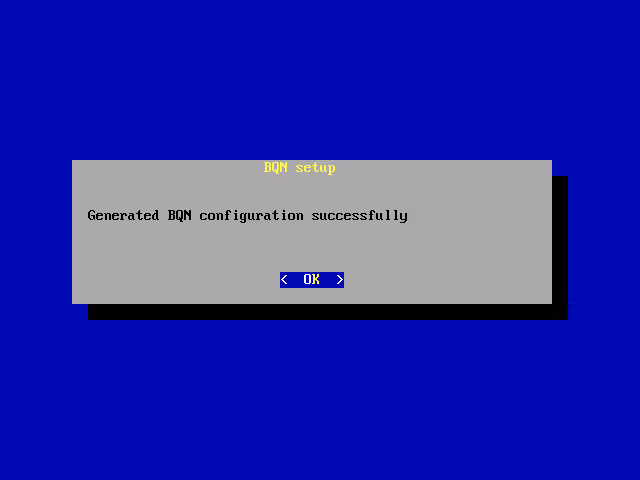
If all goes well, a dialogue informs about the end of the configuration.
The management settings can be changed later during the post installation procedure or, after that, using BQN GUI.
Reboot Server
Say Yes to initiate the server reboot:
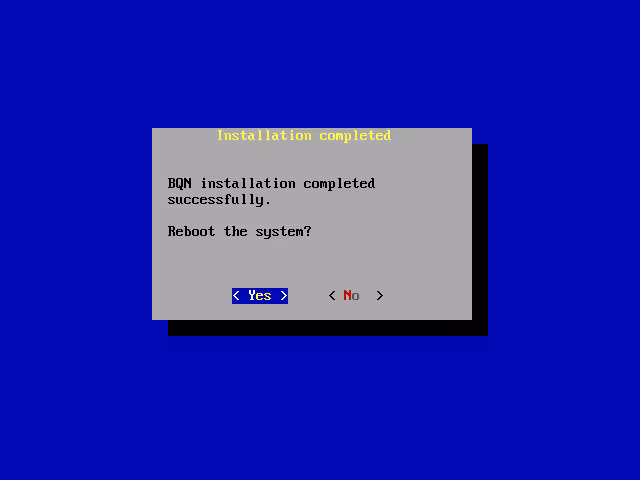
Remove the USB driver and SELECT Reboot.

Post Installation Steps
Once the software installation procedure of the previous section has been completed, after rebooting the system, some post installation tasks are needed.
Configuration wizard, basic case
Log into the system as root (with the password that was previously set), start the BQN shell with the bqnsh command, and run wizard bta, a wizard command that will generate an initial configuration, create the default administration users and enable the GUI:
Note that if the hardware model is supported by the wizard, the system serial number (ABCDEFG in this example) is used to automatically set the passwords of the default administrator (bqnadm) and operator (bqnop). Those passwords can be changed later on (see section about optional steps).
Configuration wizard, interactive case
The wizard can also run in interactive mode to decide at each step the configuration settings. This may be useful, for example, if we would like to change the management interface or IP address that we introduced during the installation process. ENTER will take the value suggested by the wizard between square brackets
In this example, we will make the following changes to the defaults:
- Register a DNS server (8.8.8.8).
- The management address will be 10.0.0.23/24 on VLAN 12 with default gateway 10.0.0.1.
Please note that when a change of management IP is done, you will have to log in again from the new network and to the new IP address.
Update to the latest bqn package
You should request the latest bqn bpkg package from Bequant and install it at this point. Follow the steps described here.
Final Verifications
GUI Access
Verify that the BQN server GUI is accessible via HTTPS using the management IP address and the bqnadm user just created (you cannot log into the GUI as root). In the previous example, https://10.0.0.23.
License activation
To get a valid license, provide the server Hardware ID to Bequant or the Bequant distributor. Make sure there is connectivity between the server and the Bequant license manager (in License dashboard icon, the license-mgr-connection should be in normal state).
NTP synchronization
It is important for the BQN system clock to be correct at all times. Check that the BQN server can access NTP servers. The NTP icon in the dashboard should be in Normal state (it can take a few seconds to synchronize).
Additional information
See the troubleshooting section for a description of the state of the dashboard icons and how to get them to normal state.
Installation in KVM
If you would like to run BQN with a KVM hypervisor, the KVM software requirements are the following:
- Linux kernel of the host machine should be version 4.11 or later.
- QEMU should be version 2.9 or later.
The following sections describe the configuration details. We will use virt-manager, the Virtual Machine Manager part of the libvirt package, to interact with QEMU, but equivalent commands should be available in other popular managers.
Virtual Machine Creation
- Copy the Bequant ISO file to the host machine where the VM will be created.
- Select New Virtual Machine.
- Under Connection, choose the host where the VM will be created (local or remote to the virt-manager).
- Select Choose ISO or CDROM install media as the installation method.
- Type the path to the Bequant ISO file previously copied to the host machine.
- Under Choose the operating system you are installing, enter openSUSE.
- Under Choose memory and CPU setting, select the desired amount of memory and the number of CPUs (see the virtual platform section of Hardware requirements).
- Do not emulate a CPU model, keep the host hardware one.
- In the window that follows, select the desired disk size.
- Check the option Customize configuration before install.
Virtual Disk
- Select either VirtIO or SATA disk bus types.
Network Interfaces
A minimum of three interfaces must be created in the VM. The first interface, used for management, is normally added when the VM is created. If it is not, select Add hardware and choose Network.
The physical ports that will be used for the data plane of the virtual machine must be Intel and configured in PCI-passthrough mode:
- Verify that the CPU of the host server has the VT-d instruction set enabled. This is usually set under the server BIOS menu.
- The host OS kernel must have the kernel parameter intel_iommu enabled.
- Select Add Hardware.
- Choose PCI Host Device.
- Under Host Device select the network interface to be used in PCI passthrough.
Installation in VmWare
If you would like to run BQN with a KVM hypervisor
A minimum of three interfaces must be created in the VM, one for management and two for data plane traffic.
- The management interface can be connected to a pre-existing virtual switch used for the management of other VMs.
- The physical ports that will be used for the data plane of the virtual machine must be Intel and configured in PCI-passthrough mode. Under Host->Manage->Hardware->PCI devices,mark Toggle Passthrough in the two data plane ports.
- Create the virtual machine with Guest OS family equal to Linux and Guest OS version equal to SUSELinux Enterprise 12.
- Under Memory, mark Reserve all guest memory.
- Do not emulate a CPU model, keep the host hardware one.
- In the Machine menu Add other device->PCI device page, the two physical ports previously placed in passthrough mode should be available. Select them both.
- Select the desired amount of memory, CPUs and disk space (see the virtual platform section of Hardware requirements).
- Configure a CD/DVD Media of type Datastore ISO file and select the BQN ISO file to install.
Servers with serial port
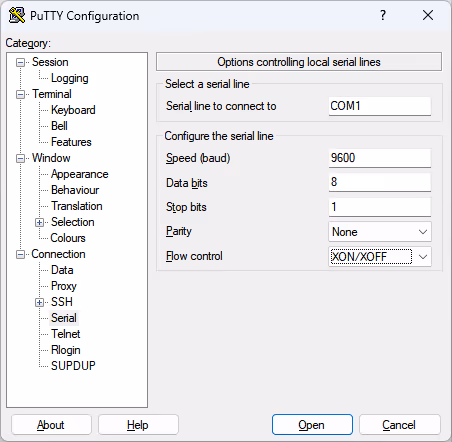
For servers where console access can be only through a serial port (e.g. Advantech), the steps as as follows:
- Connect the server serial port with a PC using a suitable cable (e.g. from DB9 to USB).
- Use a terminal application in your PC to connect to the console over the serial port. For example, in Windows, one option is a putty connection with the following settings.
In Linux, you can use the following command:
Once connected, you can follow the normal procedure (BIOS settings, boot from ISO and post installation).
Lorem ipsum dolor sit amet, consectetur adipiscing elit. Suspendisse varius enim in eros elementum tristique. Duis cursus, mi quis viverra ornare, eros dolor interdum nulla, ut commodo diam libero vitae erat. Aenean faucibus nibh et justo cursus id rutrum lorem imperdiet. Nunc ut sem vitae risus tristique posuere.
Lorem ipsum dolor sit amet, consectetur adipiscing elit. Suspendisse varius enim in eros elementum tristique. Duis cursus, mi quis viverra ornare, eros dolor interdum nulla, ut commodo diam libero vitae erat. Aenean faucibus nibh et justo cursus id rutrum lorem imperdiet. Nunc ut sem vitae risus tristique posuere.
Lorem ipsum dolor sit amet, consectetur adipiscing elit. Suspendisse varius enim in eros elementum tristique. Duis cursus, mi quis viverra ornare, eros dolor interdum nulla, ut commodo diam libero vitae erat. Aenean faucibus nibh et justo cursus id rutrum lorem imperdiet. Nunc ut sem vitae risus tristique posuere.